 |
v0.14.0 |
|
v0.14.0 |
Docker is an open platform that allows for the distribution and deployment of applications across different systems. In the context of MoFEM it allows for the distribution of pre-compiled libraries for the Docker platform that can then run on any system. The Docker platform works by using the functionality provided by the Linux kernel to provide lightweight containers and thereby avoiding the need to run costly virtual machines. It’s through the use of containers that MoFEM is compiled and run.
This installation is suitable for Linux, macOS and some versions of Windows. In macOS, a lightweight Linux distribution is virtualized to run the Docker containers in.
You can download and install Docker following instructions on the Docker installation webpage.
If you are using Windows you might have to set up some additional settings. For that you can follow video with instructions or instructions on docker website and come back to this page once Docker is running.
These instructions are for installing specific versions of MoFEM containers. To have a more advanced installation for developers see Installation with Docker - advanced.
The containers available at the moment are:
| Purpose | Image | Tag |
|---|---|---|
| Workshop2023 | likask/mofem-spack-jupyterhub | Workshop2023 |
| Development | likask/mofem-spack-build | latest |
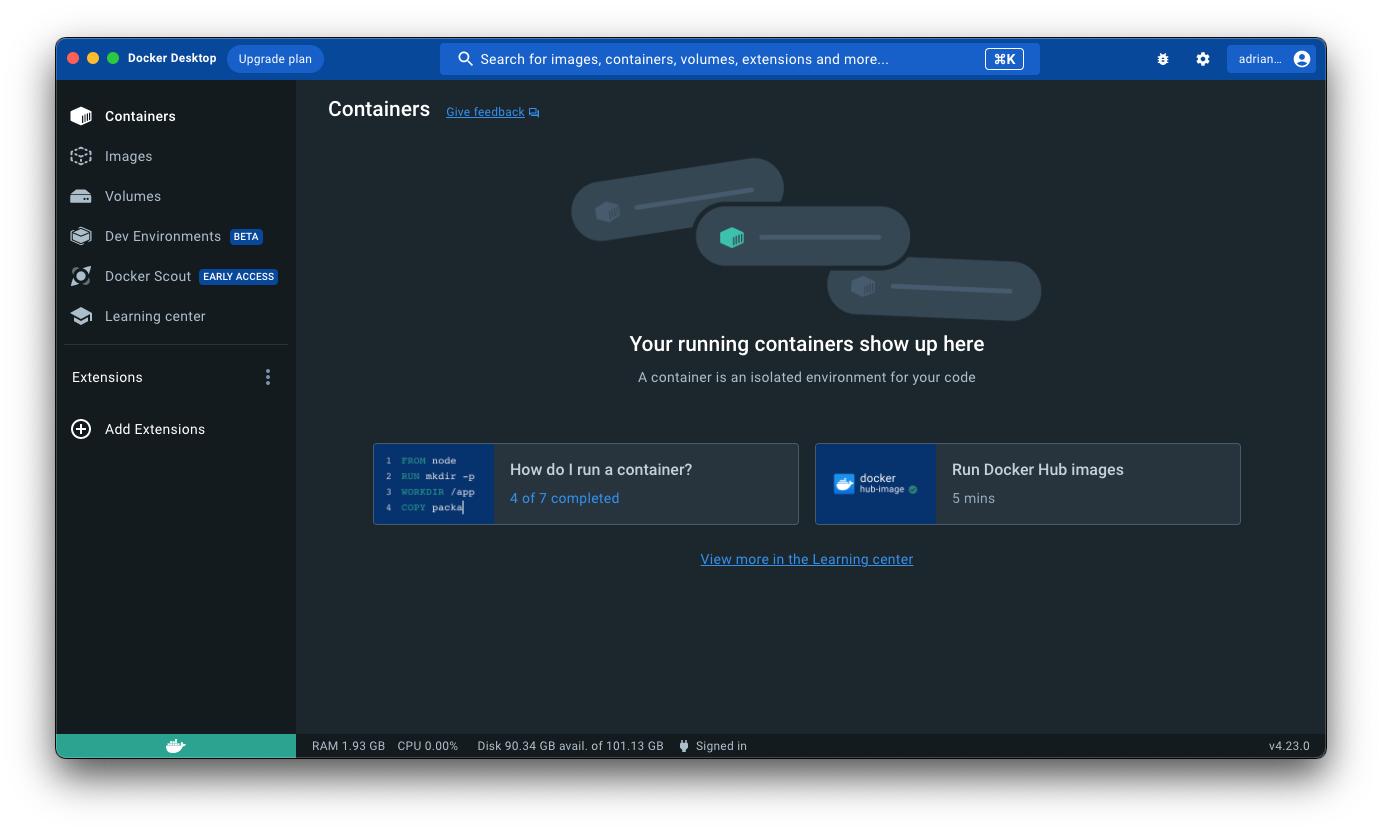
This section describes how to set up and run the Docker container within the Docker user interface. For doing this in terminal, go to the next section.
After opening Docker you should be able to see and follow similar options to the ones shown in the screenshots below, depending on the operating system and version of Docker you have.
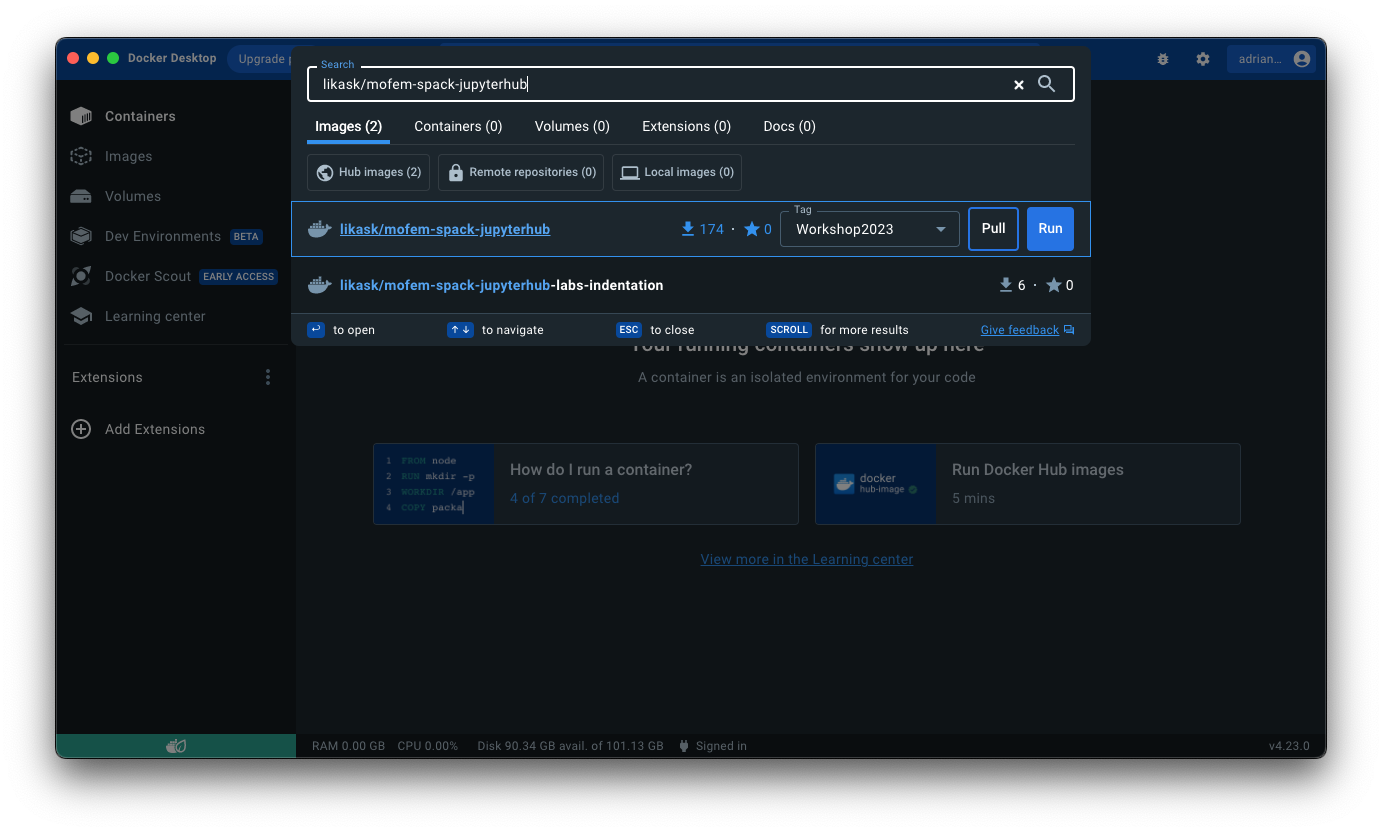
At the top you can see a search bar and if you are connected to Internet you can search for the container you want to run. Start typing likask/mofem-spack-jupyterhub and you should be able to see Workshop2023 option in the tag dropdown menu next to the Image. The steps are the same for the other containers listed above, using the relevant Image and tag names.
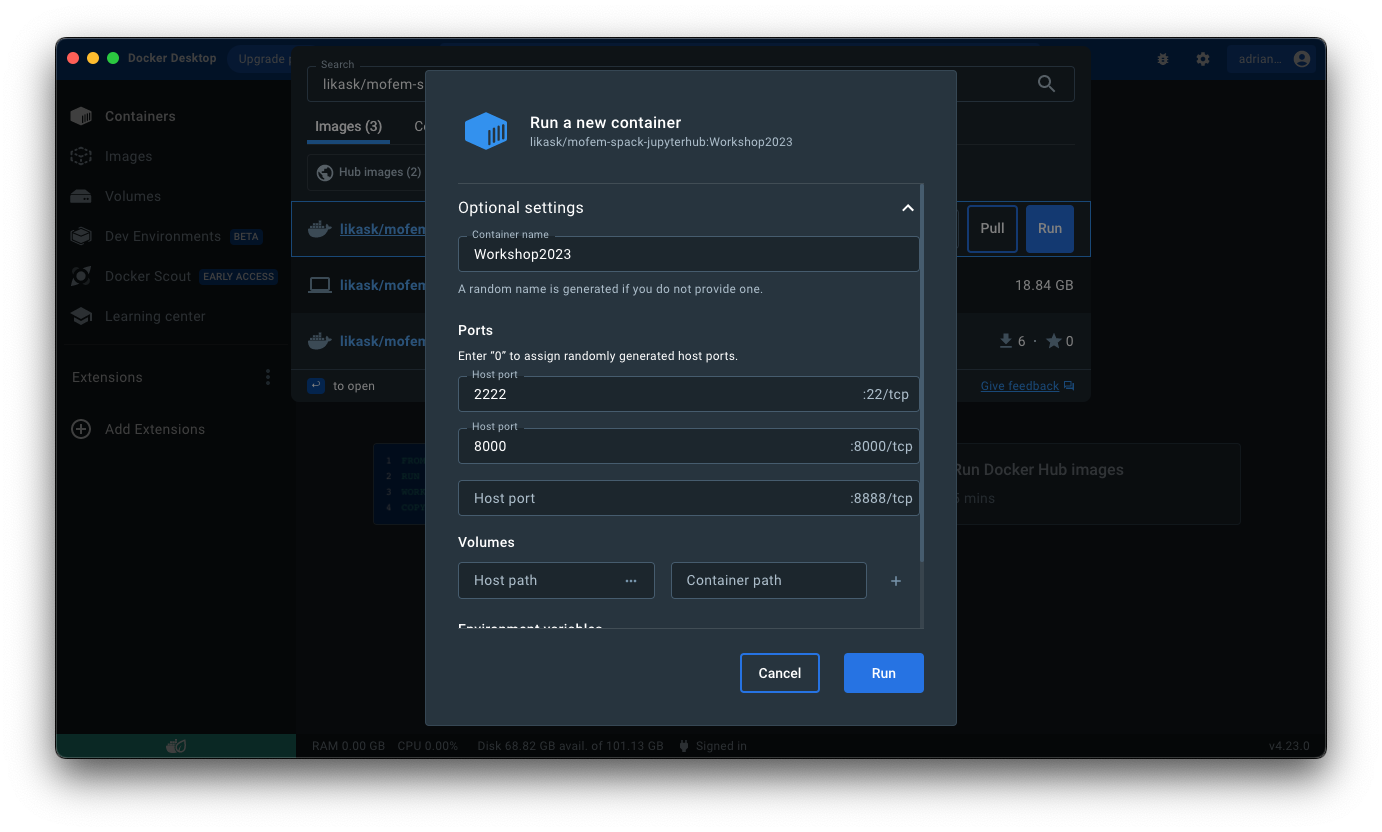
Press Run to pull and run the container at the same time. A popup window should appear once the image is downloaded, as in Figure 3. The download time varies with the size of the container and internet speed and may take some time.
If the popup window doesn't appear, navigate to
Imagesin the left menu and initialise the container by pressing triangle by the relevant image.
Expand Optional settings and fill the fields as shown in Figure 3. These settings set the ports for ssh and browser to connect to the JupyterHub container.
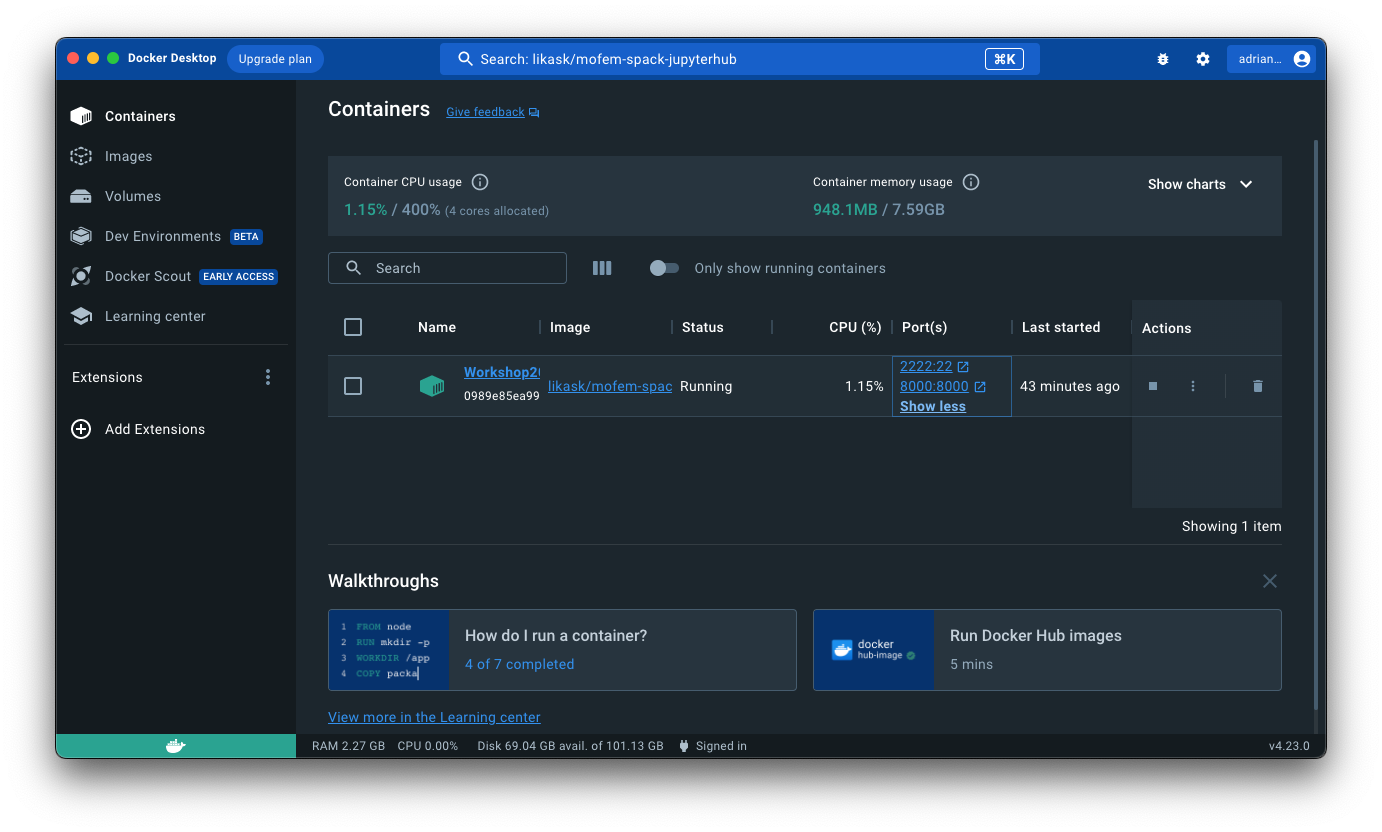
After filling in the fields as above, press Run. The installed container can be found in the Containers section in the menu on the left. To open the container in your browser click on the second option in the Port(s) column of the required container or go to http://localhost:8000.
If you want to stop the container, you can do so from the Actions column on the right. Click on square to stop, and triangle to start it again.
If you used the Docker user interface for this installation, you can skip this section and continue to Accessing the hub section to find login options and how to run notebooks.
For the installation using terminal, initialise Docker, open your terminal and run the following command.
1) Pull image
If you want to use a different image from the list of available ones, replace likask/mofem-spack-jupyterhub:Workshop2023 by image_name:tag_name taken from table listing images and tags.
2) Run container
Once installed, you do not have to reinstall the container if it was stopped. Instead, start it again by:
Similarly to viewing installed containers in user interface, you can view them in terminal, by running:
If you have a Mac with an ARM chip, you have to switch platforms when you run docker:
That results in a suboptimal performance, however, it is a workable solution.
The base system of our images is Ubuntu 20.04. To compile code for ARM architecture, we would have to upgrade the system to Ubuntu 22.04, and then it would be possible to compile MoFEM ecosystem for Apple Silicon. That is tested and works. However, additionally, you would have to compile Gmsh from scratch. Python pip installation for Gmsh on ARM architectures is not currently available. If you know how to do it, we will welcome PR from you to fix this problem.
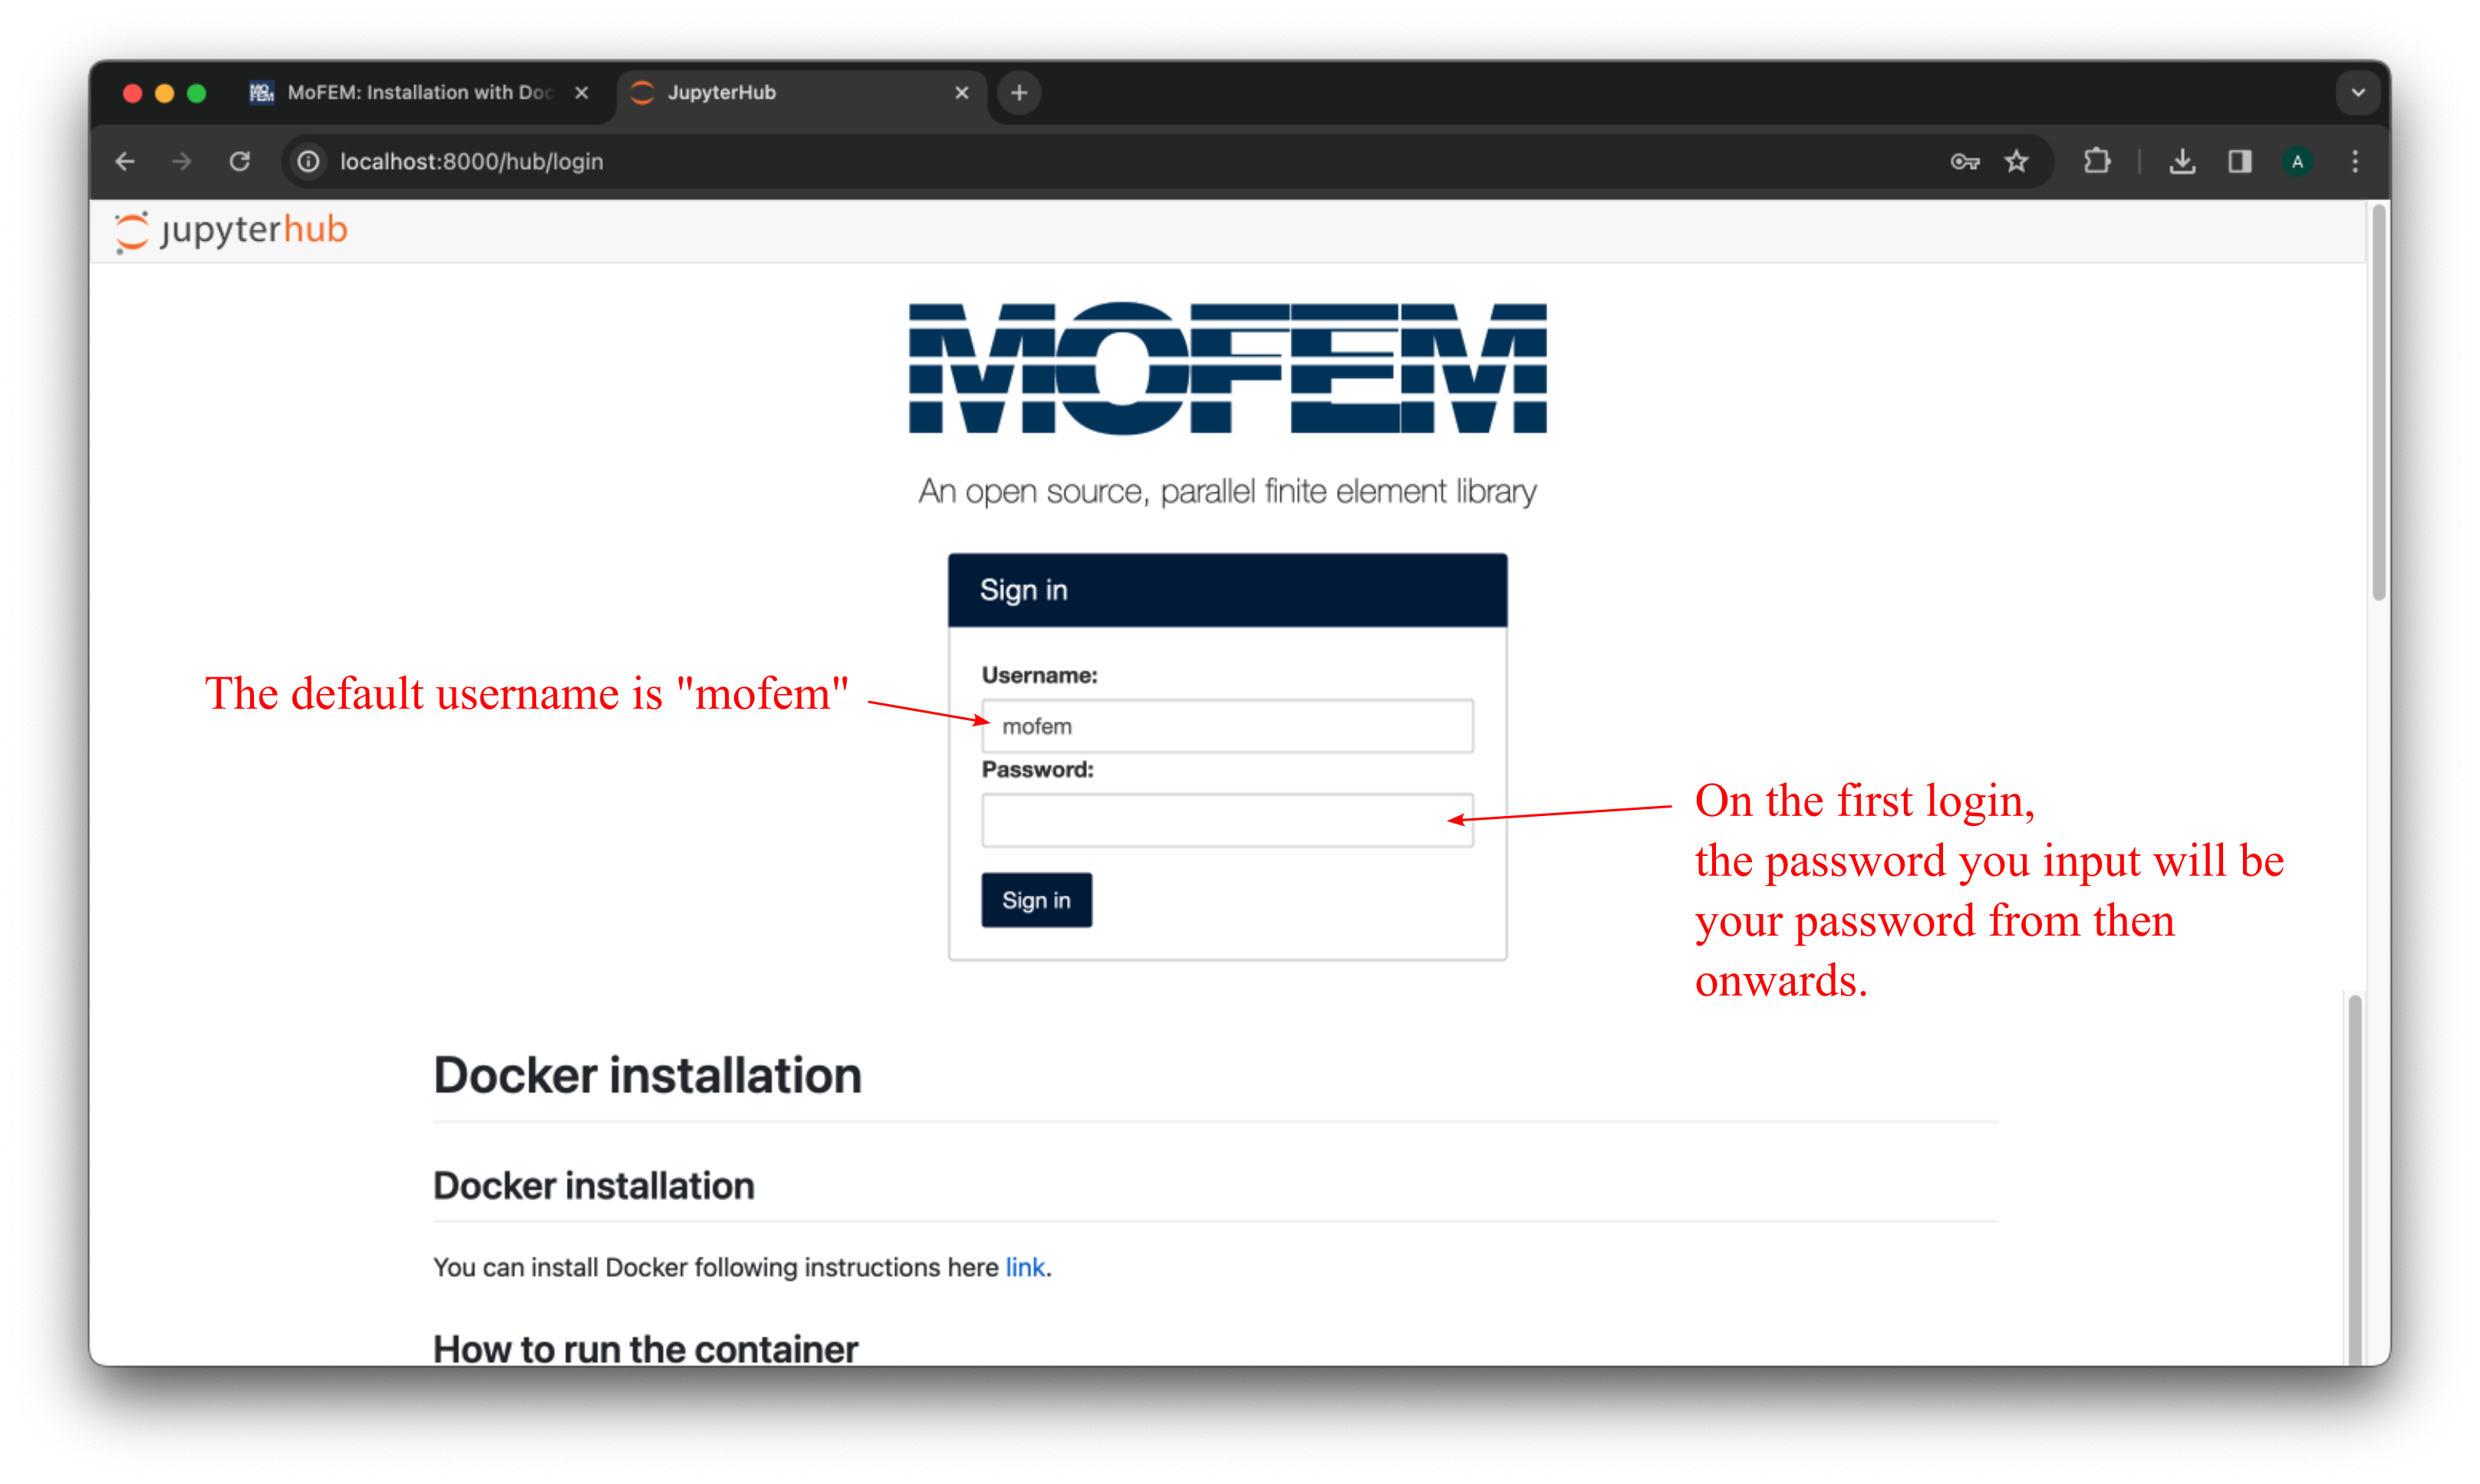
If you run a container locally, open http://localhost:8000 in your browser. Otherwise, substitute localhost by the name of your server. You should see a login page which looks as follows:
If you login as
mofemuser, you will have admin right in the JupyterHub, and you can add more users there by going toControl Panel -> Admin -> Add Users
This is a case when the container is running on a server, and you share resources with other users.
You can also watch the step-by-step instructions for running container with MoFEM and JupyterHub using Docker user interface in the following video:

If you wish to develop and debug in MoFEM using the just created container, read this section. Otherwise, you are done, and you can ignore the following instructions
Remember to have your docker container running when executing these instructions. If you have stopped the container, restart it with the triangle button of the relevant container, see Figure 4.
First of all, set up your SSH password. This is different from the one you use to access JupyterHub in the browser. To set it, run the following command from a terminal (in case you are using Docker user interface, you can open terminal by clicking on the three vertical dots in the Actions column, see Figure 4):
where workshop2023 is the name of your container set in Optional settings and can be found in the Name column of the Containers section. To change the password for user mofem run:
and afterwards choose a new password.
In your browser (http://localhost:8000), login to the JupyterHub and open install_from_source_debug notebook and run all of the cells in it. This will checkout the source code of MoFEM core and basic user modules including tutorials, and compile user modules. New folders will appear in your starting directory:
mofem_install - contains source codeum_view_debug - symbolic links to the executable binaries of the debugging versionWe advise you to wait until all of the cells have been run since some of the next steps refer to directories which are newly created by running this notebook.
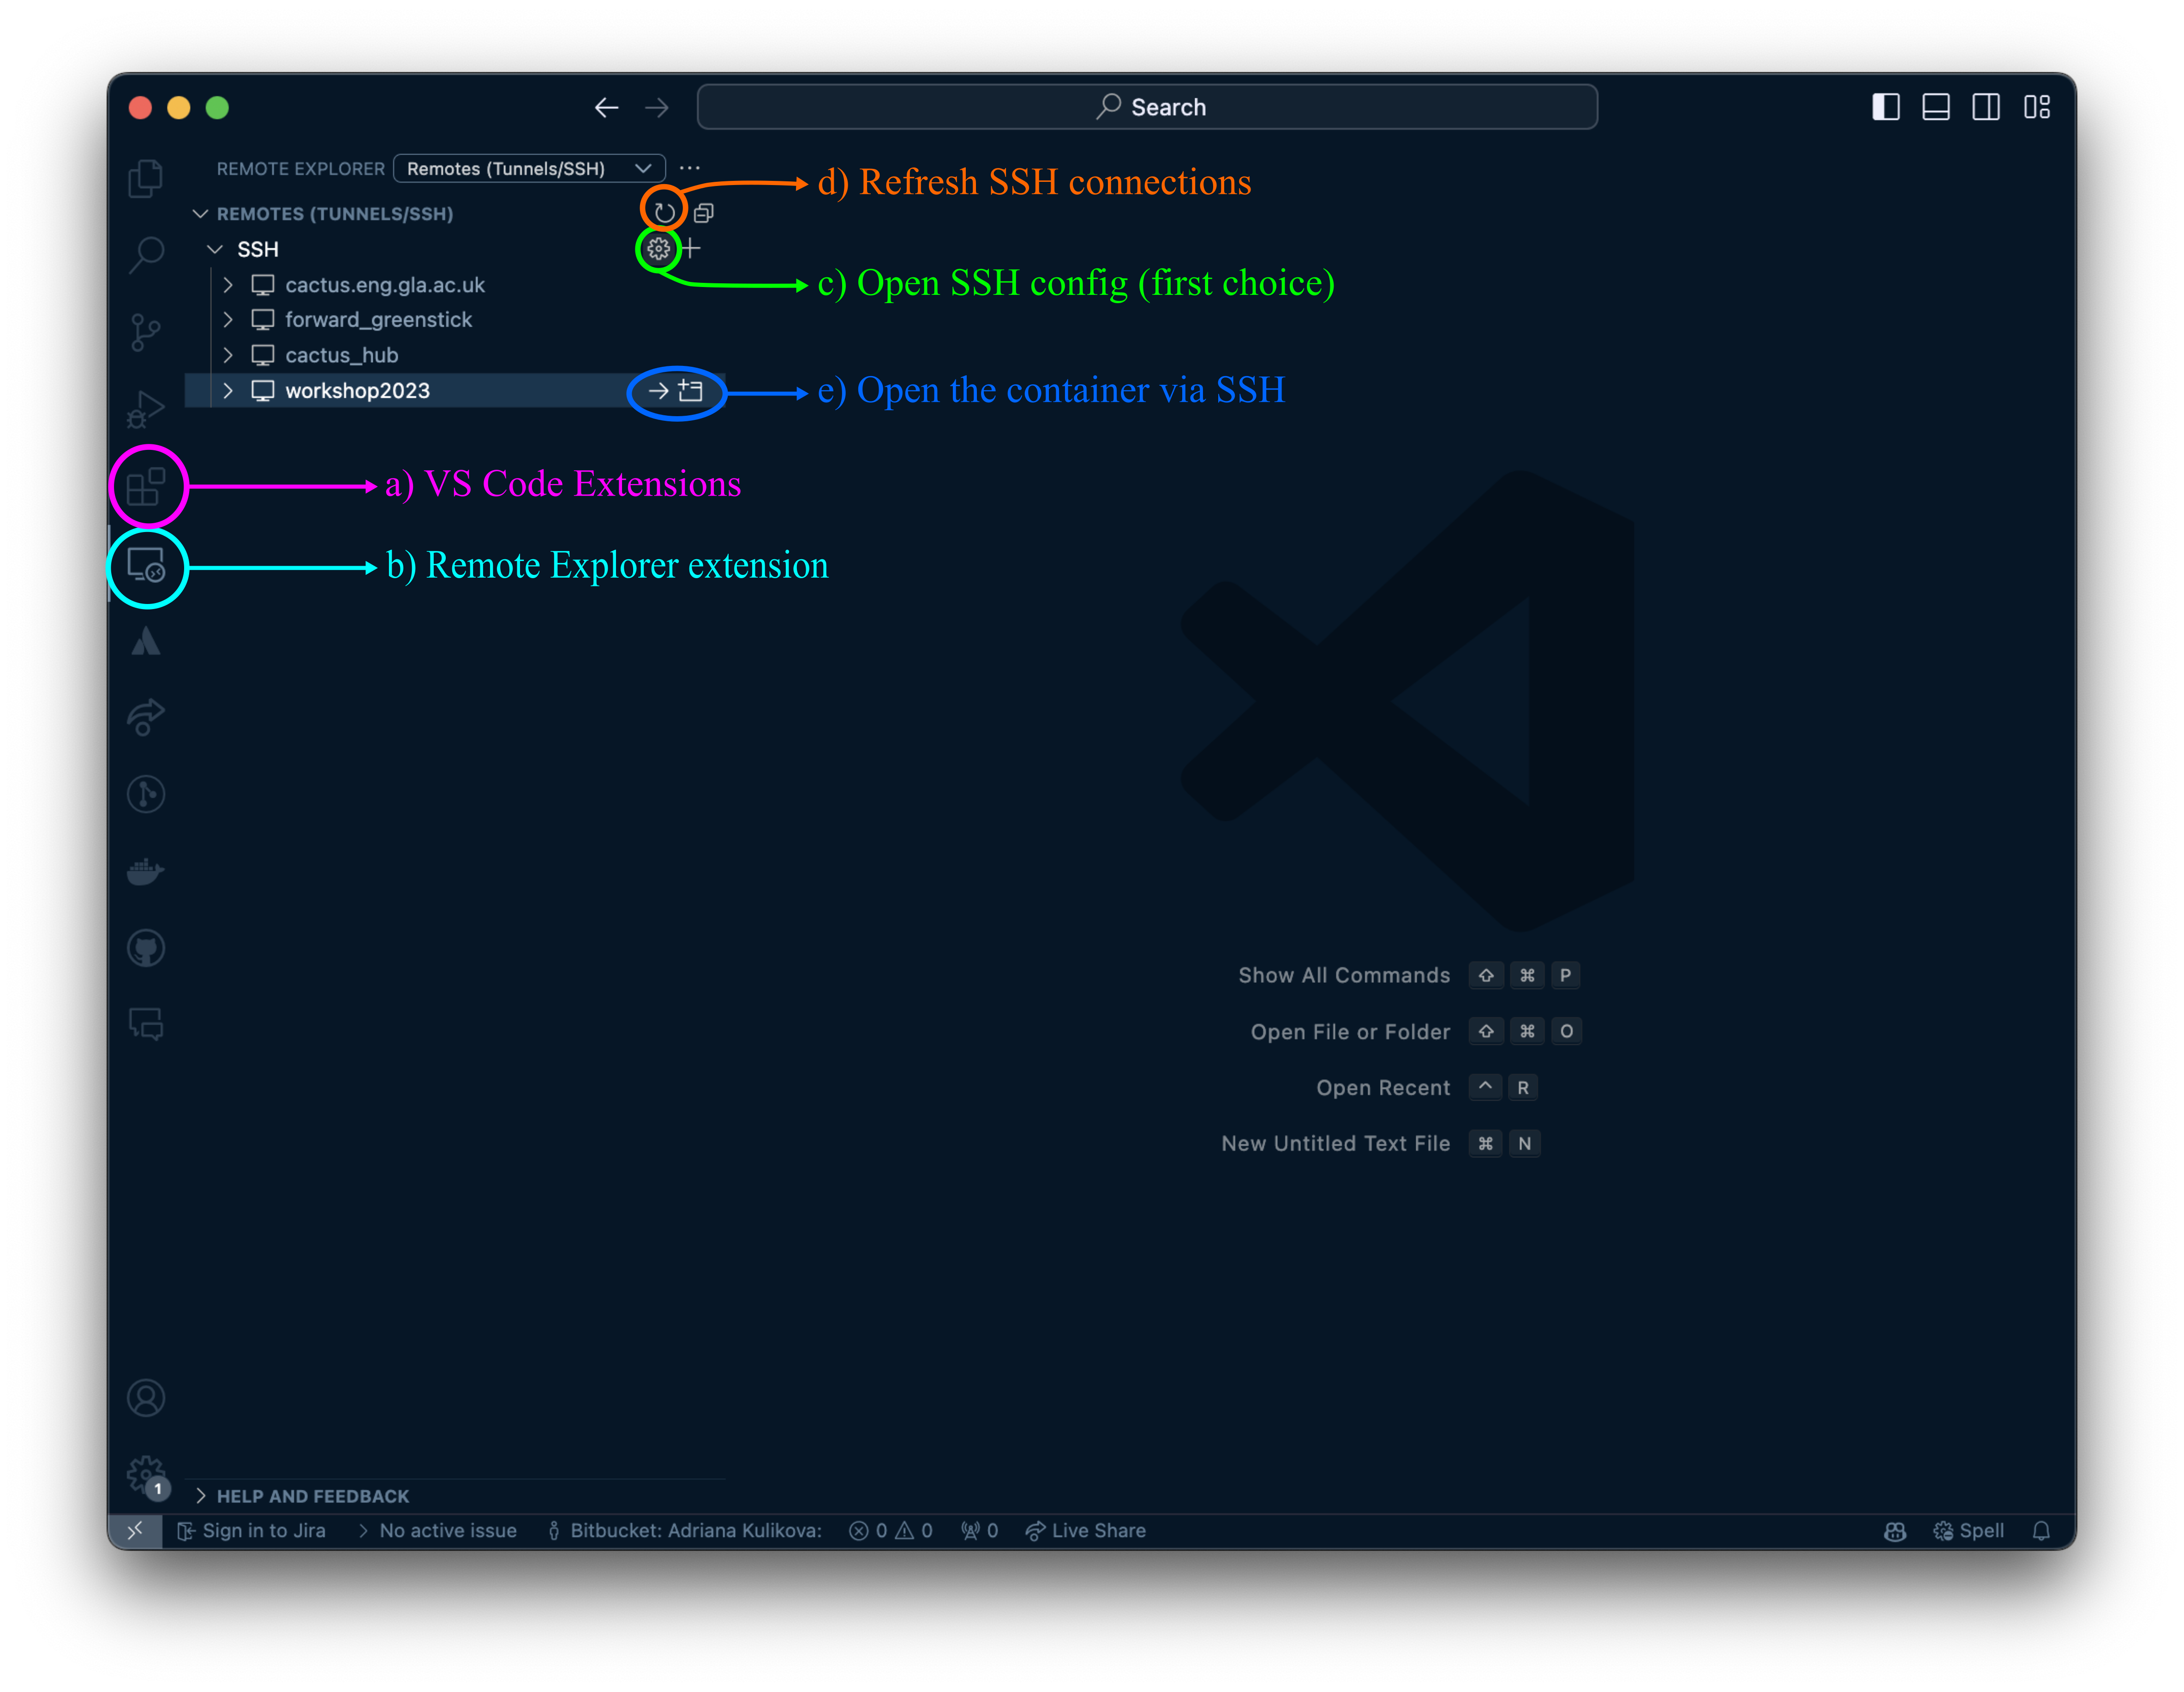
We will only cover the process with using Visual Studio Code. Start by making sure you have it installed. Figure 6 shows locations of the next steps.
a) Go to Extensions within VS Code and install Remote - SSH extension. This will allow you to connect to servers or containers like the one we created.
b) Open Remote Explorer extension
c) Press on the gear button highlighted as c) (you might need to hover over), open your .ssh/config file and copy there the following lines:
Here, we can see the port forwarding number 2222 we set up for our container earlier.
d) Refresh SSH connections (you might need to hover over) to see the option to connect via SSH to the container in the Remote Explorer extension in VS Code.
e) Connect to the container in VS Code (use the SSH password you set previously) and you should see the same folders and files as you do when you open it through a web browser (http://localhost:8000).
If you are asked about the environment by VS Code during these steps, select
Linux.
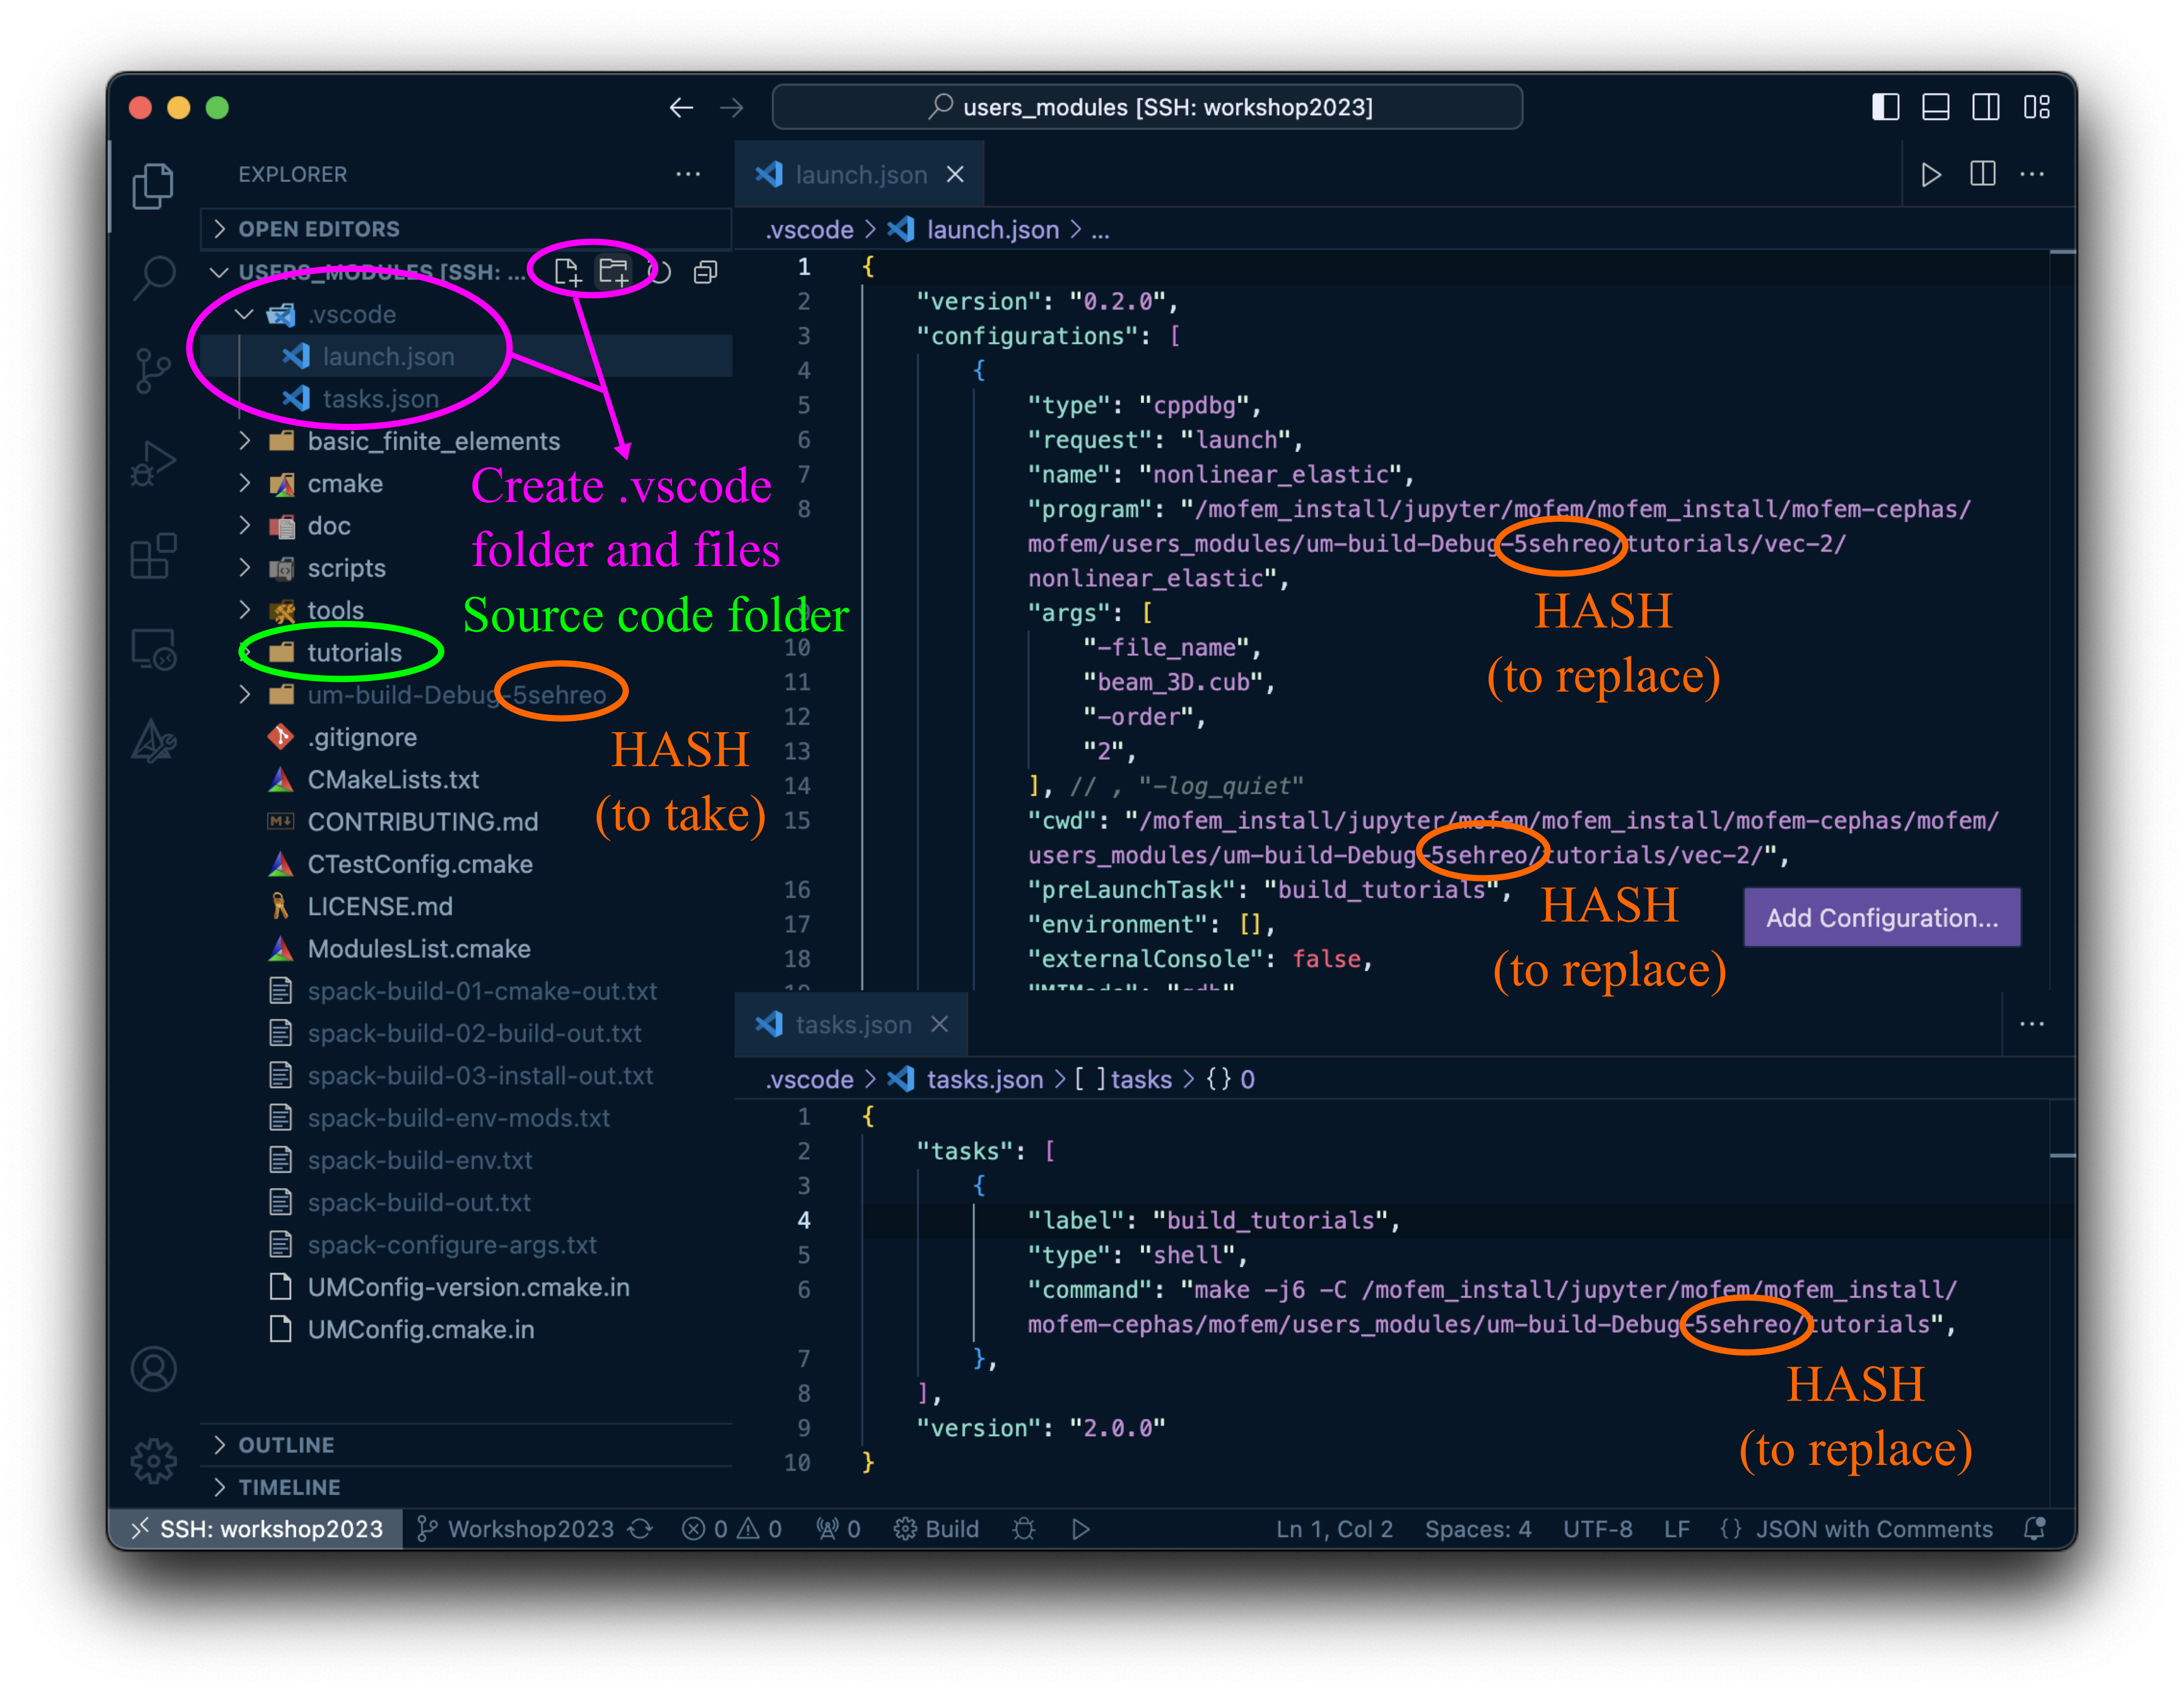
To set up debugging, follow these steps:
~/mofem_install/mofem-cephas/mofem/users_modules folder through File -> Open Folder...Extensions within VS Code, see Figure 6 a) , and install C/C++ and C/C++ Extension Pack extensions.vscode folder, download files launch.json & tasks.json and place them into the .vscode folder, see Figure 75sehreo with the hash in your folder, see HASH in Figure 7In launch.json, /mofem_install/jupyter/mofem/mofem_install/mofem-cephas/mofem/users_modules/um-build-Debug-5sehreo/tutorials/vec-2/ is the folder where the executable is located and you can change it to what you want to debug. nonlinear_elastic is the executable name. We suggest copying and then searching for these terms to change them in all of the locations. Lastly, check which mesh (required by the flag -file_name) is located at the current working directory.
tasks.json file defines which folder should be rebuild before running your code with debugging.
For this section refer to Figure 8.
This should trigger recompilation of the folder defined in tasks.json, start the analysis, and eventually stop at the breakpoint if everything was set correctly. You can use controls to navigate the debugging session. For more information see VS Code instructions for debugging.
The same procedure can be applied for any other users you create and everyone can debug separately.
You can also watch the step-by-step instructions for setting up MoFEM debugging within Docker container using VScode in the following video:
To run the example notebooks with the code which was amended during debugging, new compilation will be needed. The existing symbolic links in your home directory in JupyterHub are:
mofem_install source directory in your folder)For running larger problems, like the ones in some of the example notebooks, using a release version is advised as it is much faster. um_view is a release version but not of the code which you might have amended during the debugging part of these instructions. To compile this code with a release version run the install_from_source_release.md notebook, located in your home folder. This will compile a new release version and create um_view_release folder in your home folder:
To run the notebooks provided with the amended version of the code, replace um_view in the path definitions in the notebooks you want to run with um_view_release.
If you change the code again, do not rerun the install_from_source_release.md notebook. Instead, run just the last cell in install_from_source_release.md or run the following command in the integrated terminal when connected to the container in VS Code:
For developer, you may wish to have a look at these two tutorials for compiling the code and adding new modules in MoFEM:
Any problems with this installation, please contact us by mofem-group@googlegroups.com.